(First posted 14 February, 2021)
Recently I bought a touch screen and attached it to one of my older Raspberry Pi’s (a 3B). In fact the Pi is attached to the back of the touch screen and has some very short cables. This is only a 7 inch diagonal screen but it’s more than enough for the experiment I’m going to describe.
Some of you will recognise I’ve used similar things – Stream Decks and Metagrid – in the past. Most recently I showed a Metagrid screenshot in Automating Microsoft Excel Some More.
So it will be no surprise that I’m experimenting with push-button automation again. But this time I’m experimenting with something that is a little more outside the Apple ecosystem. (Yes, Stream Deck can be used with Windows PCs but that isn’t how I use it.)
While both Stream Deck and Metagrid are commercially available push-button automation products, I wanted to see what I could do on my own. I got far enough that I think I have something worth sharing with other people who are into automation.
What I Built
The following isn’t going to be the prettiest user interface in the world but it certainly gets the job done:
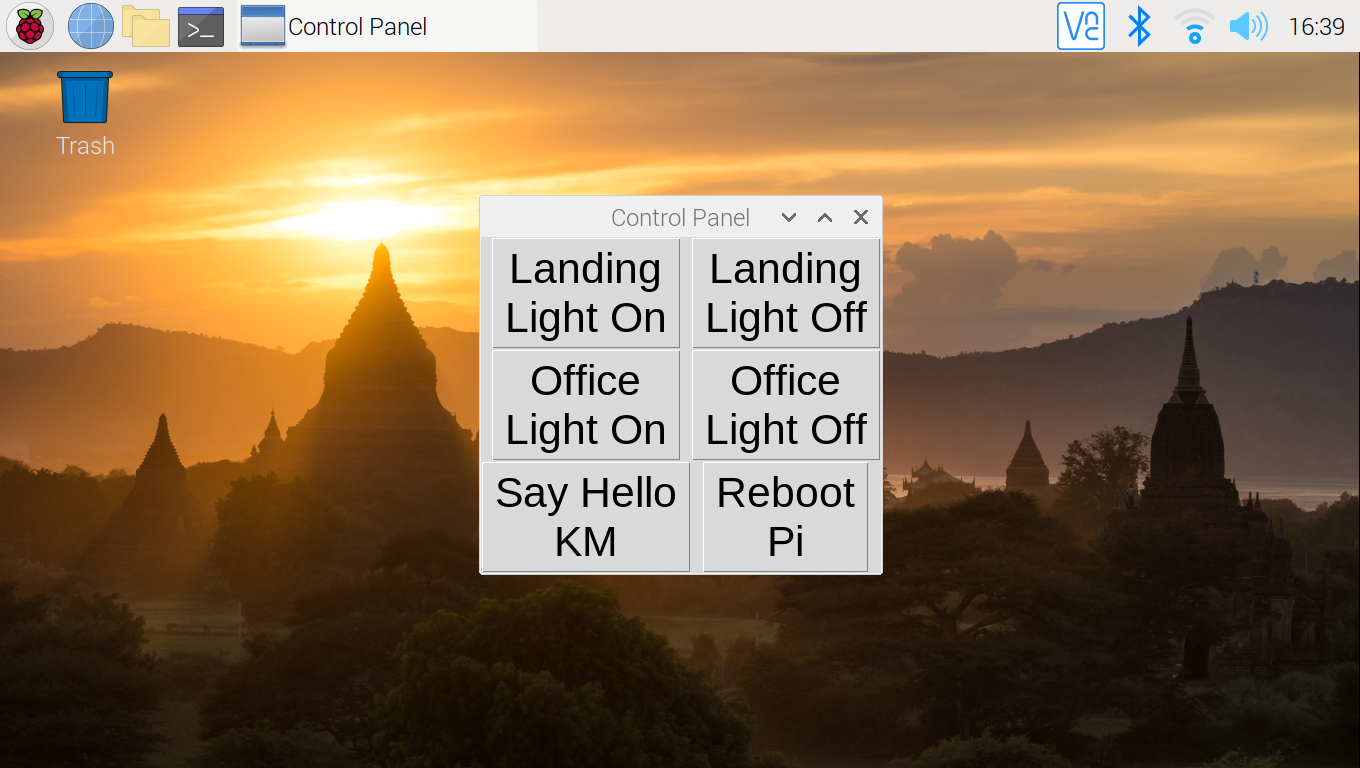
Here are what the buttons in the code sample do (for me):
- The top row of buttons allows me to turn the landing lights on and off.
- The middle row does the same but for my home office.
- The bottom row has two dissimilar functions:
- Running a simple Keyboard Maestro macro.
- Rebooting the Raspberry Pi.
This is quite a diverse set of functions and I want to show you how they were built.
By the way the screen grab was done with the PrtSc (“Print Screen’) key and transferred to my iPad using Secure Shellfish.
I used this article to figure out how to auto start the Python code when the Pi boots. It doesn’t get me into “kiosk mode” but then I didn’t really want it to.
Python Tkinter User Interface
What you see on the screen is a very simple Python program using the Tkinter graphical user interface library
The following is the code I wrote. If you just copy and paste it it won’t run. There are two modifications you’d need to make:
- You need to supply your IFTTT maker key – enclosed in quotes.
- You need to supply the URL to your Keyboard Maestro macro – for each macro.
If you don’t have IFTTT you could set IFTTTbuttonSpecs to an empty list. Similarly, if you don’t have any externally callable Keyboard Maestro macros (or externally callable URLs) you would want to make URLButtonSpecs an empty list.
You can, of course, rearrange buttons by changing their row and column numbers.
#!/usr/bin/env python3
import tkinter as tk
import tkinter.font as tkf
from tkinter import messagebox
import urllib.request
import urllib.parse
import os


class Application(tk.Frame):
    def __init__(self, master=None):
        tk.Frame.__init__(self, master)
        self.grid()
        self.createWidgets()
        self.IFTTTkey = <Insert your IFTTT Key Here>

    def createWidgets(self):
        self.bigFont = tkf.Font(family="Helvetica", size=32)
        IFTTTbuttonSpecs = [
            ("Landing", True, "Landing\nLight On",0,0),
            ("Landing", False, "Landing\nLight Off",0,1),
            ("Office", True, "Office\nLight On",1,0),
            ("Office", False, "Office\nLight Off",1,1),
        ]

        URLButtonSpecs = [
            ("Say Hello\nKM", <Insert your Keyboard Maestro macro's URL here>,2,0)
        ]

        localCommandButtonSpecs = [
            ("Reboot\nPi","sudo reboot",2,1),
        ]

        buttons = []

        # IFTTT Buttons
        for (lightName, lightState, buttonLabel, buttonRow, buttonColumn) in IFTTTbuttonSpecs:
            # Create a button
            button = tk.Button(
                self,
                text=buttonLabel,
                command=lambda lightName1=lightName, lightState1=lightState: self.light(
                    lightName1, lightState1
                ),
                font=self.bigFont,
            )

            button.grid(row=buttonRow, column=buttonColumn)

            buttons.append(button)

        for (buttonLabel, url, buttonRow, buttonColumn) in URLButtonSpecs:
            # Create a button
            button = tk.Button(
                self,
                text=buttonLabel,
                command = lambda url1 = url : self.doURL(
                    url1
                ),
                font=self.bigFont,
            )

            button.grid(row=buttonRow, column=buttonColumn)

            buttons.append(button)

        for (buttonLabel, cmd, buttonRow, buttonColumn) in localCommandButtonSpecs:
            # Create a button
            button = tk.Button(
                self,
                text=buttonLabel,
                command = lambda cmd1 = cmd : self.doLocalCommand(
                    cmd1
                ),
                font=self.bigFont,
            )

            button.grid(row=buttonRow, column=buttonColumn)

            buttons.append(button)

    def light(self, room, on):
        if on:
            url = (
                "https://maker.ifttt.com/trigger/"
                + urllib.parse.quote("Turn " + room + " Light On")
                + "/with/key/"
                + self.IFTTTkey
            )
        else:
            url = (
                "https://maker.ifttt.com/trigger/"
                + urllib.parse.quote("Turn " + room + " Light Off")
                + "/with/key/"
                + self.IFTTTkey
            )
        opening = urllib.request.urlopen(url)
        data = opening.read()

    def doLocalCommand(self, cmd):
        os.system(cmd)

    def doURL(self, url):
        opening = urllib.request.urlopen(url)
        data = opening.read()

app = Application()
app.master.title("Control Panel")
app.mainloop()
I’ve structured the above code to be extensible. You could easily change any of the three types of action, or indeed add your own.
Hue Light Bulbs And IFTTT
Philips Hue light bulbs are smart bulbs that you can turn on and off with automation. There are others, too, but these are the ones I happen to have in the house, along with a hub. I usually control them with Siri to one of the HomePods in the house or Alexa on various Amazon Echo / Show devices.
IFTTT is a web-based automation system. You create applets with two components:
- A trigger.
- An action.
When the trigger is fired the action happens. In my experiment a webhook URL can be set up to trigger the Hue Bulb action. For each of the four buttons I have an applet. Two bulbs x on and off.
I would observe a number of things I don’t much like, though none of them stopped me for long:
- The latency is a few seconds – but then I usually don’t need a light to come on or go off quicker than that.
- You can’t parameterise the applet to the extent I would like, more or less forcing me to create one applet per button.
- You can’t clone an IFTTT applet. So you have to create them by hand.
Still, as I said, it works well enough for me. And I will be keeping these buttons.
Remotely Invoking Keyboard Maestro
This one is a little more sketchy, but only in terms of what I’ll do with it. You’ll notice I have “Hello World”. The sorts of things I might get it to do are:
- Opening all the apps I need to write a blog post. Or to edit a certain presentation.
- Rearranging the windows on my screen.
Keyboard Maestro is incredibly flexible in what it allows you to do.
To be able to call a macro you need to know two things:
- Its UUID.
- The bonjour name (or IP address) of the Mac running Keyboard Maestro.
You also need to have enabled the Web server in the Web Server tab of Keyboard Maestro’s Preferences dialog.
To construct the URL you need to assemble the pieces something like this:
http://<server name>:4490/action.html?macro=<macro UUID>
The UUID can be obtained while editing the macro using menu item “Copy UUID” under “Copy As” from the “Edit” menu.
It’s a little complicated but it runs quickly and can do a lot in terms of controlling a Mac.
Rebooting The Raspberry Pi
This one is the simplest of all – and the quickest. Python has the os.system() function. You pass a command string to it and it executes the command. In my case the command was sudo reboot.
It’s not surprising this is quick to kick off – as this is a local command invocation.
After I copied the Python code into this blog post I decided I want a companion button to shut down the Pi – for cleaning purposes. This would be trivial to add.
Conclusion
This is quite a good use of a semi-redundant Raspberry Pi – even if I spent more on the touch screen than I did on the Pi in the first place. And it was ever thus. 🙂
The diversity of the functions is deliberate. I’m sure many people can think of other types of things to kick off from a push button interface on a Raspberry Pi with a touch screen. Have at it! Specifically, feel free to take the Python code and improve on it – and tell me how I’m doing it all wrong. 🙂 Have fun!
I, for one, intend to keep experimenting with this. And somebody makes a 15” touch screen for the Pi… 🙂

2 thoughts on “Raspberry Pi As An Automation Platform”